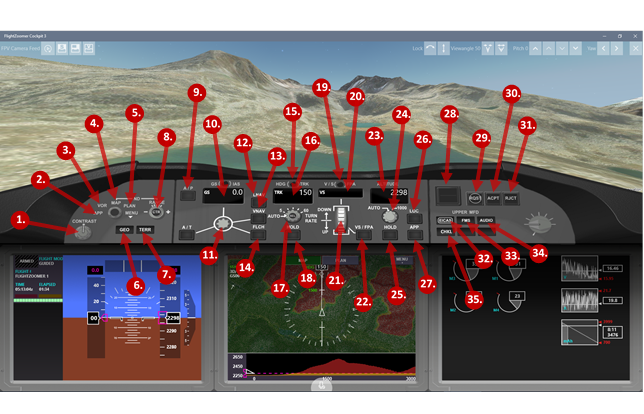
7.2.2 Glareshield
|
|
Feature :: Command |
Remarks |
|
1 |
Display Control Panel :: CONTRAST |
Navigation Display brightness. Less by pressing on the left of the dial, more by pressing on the right of the dial. |
|
2 |
Display Control Panel :: APP selection |
Activates the approach display mode, which shows lateral and vertical deviation indications on the Navigation Display and the Primary Flight Display. |
|
3 |
Display Control Panel :: VOR selection |
Activates the VOR display mode, which shows lateral deviation indications on the Navigation Display. |
|
4 |
Display Control Panel :: MAP selection |
Activates the default display mode, which shows the planned route on the Navigation Display. |
|
5 |
Display Control Panel :: PLAN selection |
Activates the alternative display mode, where north is always up on the Navigation Display. |
|
6 |
Display Control Panel :: GEO button |
Activates and deactivates the normal map on the Navigation Display. |
|
7 |
Display Control Panel :: TERR button |
Activates and deactivates the terrain map and the Vertical Situation Display on the Navigation Display. Switching this option off reduces system load remarkably. |
|
8 |
Display Control Panel :: RANGE control |
Increases or decreases the zoom level of the Navigation Display. Less zoom by pressing on the left of the dial, more by pressing on the right of the dial. The RANGE control also modifies the horizontal extension of the Vertical Situation Display. |
|
9 |
Autopilot :: A/P |
Activates and deactivates the autopilot. Activating the autopilot means for ArduCopter the activation of the Guided‑mode and for ArduPlane the activation of the Auto‑mode. Deactivating the autopilot (so the pilot can continue flying manually) means for ArduCopter the activation of the PosHold‑mode and for ArduPlane the activation of the Cruise‑mode. |
|
10 |
Autopilot :: Speed target value |
SPD mode is always on. The selected speed target determines the forward speed of the vehicle. |
|
11 |
Autopilot :: Speed target value selector |
Press to get a circle of speed target values on the right to pick the desired target speed. |
|
12 |
Autopilot :: LNAV button |
Activates and deactivates the LNAV mode, which follows a planned route laterally. |
|
13 |
Autopilot :: VNAV button |
Activates and deactivates the VNAV mode, which follows a planned route vertically. |
|
14 |
Autopilot :: FLCH button |
Activates and deactivates the FLCH mode, which automatically performs a climb or a descend in order to reach a changed altitude target value. |
|
15 |
Autopilot :: HDG / TRK selector |
Toggle between HDG and TRK as basic direction mode. After the autopilot is first switched on, the initial basic direction mode is always TRK. Operating 3DR Solo, HDG is not supported. |
|
16 |
Autopilot :: Direction target value |
Target value for HDG or TRK mode |
|
17 |
Autopilot :: Direction target value selector |
Press and keep pressed to get a circle of direction target values on the right to pick the desired target direction. Press and release immediately on either side of the rotary controller to iterate through the turn rate limitation settings. |
|
18 |
Autopilot :: Current direction hold button |
Press to activate HDG or TRK mode and pick the current heading or track over ground as target value. |
|
19 |
Autopilot :: V/S / FPA selector |
Toggle between V/S (Vertical Speed) or FPA (Flight Path Angle) as basic vertical mode |
|
20 |
Autopilot :: Climb/descend target value |
Target value for V/S or FPA mode. Unit for V/S is the defined display unit for length per minute (e.g. 100m per minute). The unit for FPA is °. |
|
21 |
Autopilot :: Climb/descend target value selector |
Press and move up or down in order to select the desired climb or descend target. |
|
22 |
Autopilot :: Current climb/descend hold button |
Press to activate V/S or FPA mode (depending on the V/S / FPA selector) and pick the current climb or descend rate as target value. |
|
23 |
Autopilot :: Altitude target value |
Target value for the altitude. Whenever the vehicle passes at this altitude while flying in V/S, FPA or FLCH the climb or descend is terminated and flight continues at this level. |
|
24 |
Autopilot :: Altitude target value selector |
Press to get a circle of altitude target values on the right to pick the desired target altitude. |
|
25 |
Autopilot :: Current altitude hold button |
Press to activate the ALT hold mode and terminate any other vertical mode, that was active before. |
|
26 |
Autopilot :: LOC button |
Press to capture a configured VOR radial (on the NAV RAD page of the FMS) |
|
27 |
Autopilot :: APP button |
Press to capture the localizer and glideslope of the selected ILS approach (on the NAV RAD page of the FMS) |
|
28 |
Master Warning :: Reset button and light |
Light turns yellow or red whenever a warning or error occurs. The related message is printed on the Primary Flight Display. Using the Master Warning button, the event can be acknowledged. |
|
29 |
Air Traffic Control :: RQST |
If an ILS approach is selected on the NAV RAD page of the FMS, this button can be used at any time during the flight, to request the inbuilt Air Traffic Controller (ATC) to provide guidance. By written and voice instructions, virtual ATC directs the flight into a suitable downwind and base, followed by the final approach. The button needs only to be pressed once. After that the complete sequence of instructions, that set the stage for the final approach, is generated by the FlightZoomer AI logic and issued, instruction by instruction, at the correct time. |
|
30 |
Air Traffic Control :: ACPT |
Using this button, instructions can be accepted, which were requested by the RQST button. Accepting any instruction automatically loads the required mode- and target value-changes into the autopilot for execution. |
|
31 |
Air Traffic Control :: RJCT |
Using this button, instructions can be rejected |
|
32 |
3rd Display Control :: EICAS |
Activates the engine and power management to be displayed on the rightmost cockpit screen. |
|
33 |
3rd Display Control :: FMS |
Activates the Flight Management System (FMS) to be displayed instead of the rightmost cockpit screen. |
|
34 |
3rd Display Control :: AUDIO |
Activates the Audio Control Panel to be displayed instead of the rightmost cockpit screen. |
|
35 |
3rd Display Control :: Checklist |
Puts the interactive checklist on the rightmost screen. Organized in a hierarchical structure the checklists are ordered after vehicle, flight phase or other criteria. |