7.3.7.4 ROI Sequences
Common ROI sequence properties
The common elements to handle a ROI sequence are presented on the second page of the ROI FMS page:

|
|
Element |
Remarks |
|
1 |
ROI Page Selection key |
Used to open the ROI FMS page |
|
2 |
NEXT PAGE key |
Press once to load the second page to manipulate Roi sequences. This key is also used to load the third and following subpages to define the actual ROI’s of the sequence. |
|
3 |
NEXT ROI TRIGGER selection |
Trigger type to begin the transition to the next ROI: · Pressing LSK 3L activates triggering based on passed waypoints of a flightplan. · Pressing LSK 3R activates time-based triggering (for each ROI can be specified, how long the sweep to the next ROI will take). |
|
4 |
Master ROI sequence On/Off switch |
Use LSK 1R to activate or deactivate the defined ROI sequence. If the ROI sequence is time based, the execution will immediately start. If the ROI sequence is synchronized with the planned route, the execution will immediately start if the autopilot is already in LNAV mode or wait in an armed state until the autopilot mode is changed to LNAV. |
|
5 |
STORE current |
All settings of the current ROI sequence can be stored under a given name in the scratchpad by pressing LSK 5R. |
|
6 |
LOAD stored |
By providing the right name in the scratchpad and pressing LSK 5L, all settings for a ROI sequence can be loaded from an earlier stored one. Alternatively, if line 5L is empty, pressing LSK 5L opens a list of all stored ROI sequences, so you can pick the one you want. |
|
7 |
CLEAR ALL |
Reset all settings of the ROI sequence to their default values. |
Sequence of ROI’s
The actual sequence of ROI’s is defined on the third (and following) page(s) of the ROI FMS page:
|
|
Element |
Remarks |
|
1 |
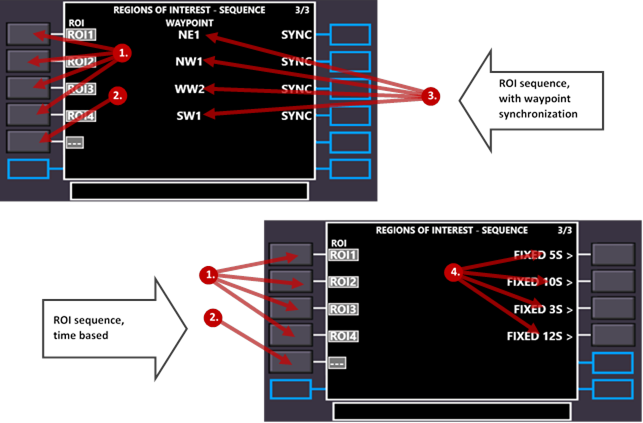
Sequence of ROI’s |
In this example a ROI sequence consisting of four ROI’s has been defined. |
|
2 |
Empty position to define |
At the fifth position, the next ROI can be appended to the sequence in this example. To do this press the respective LSK, which either directly loads the ID of a navigation aid from the scratchpad or, if the scratchpad is empty, shows the list of all available navigation aids, which allows you to pick the right one. |
|
3 |
Related waypoints |
If the ROI sequence is synchronized with the waypoints of the current flightplan, the related waypoint IDs are printed in the center column per ROI. In this example, the camera sweep towards ROI1 will end exactly when the aircraft reaches waypoint NE1. At this point immediately a sweep to ROI2 begins, which will take exactly as long, as it will take the aircraft to reach waypoint NW1. |
|
4 |
Time to next ROI |
For time-based ROI sequences, each ROI is not tied to a waypoint, but freely put on the time axis by fixed sweep times (per ROI). The ROI sequence of the given example would be executed as shown in following diagram:
Define the sweep time per ROI with LSK R1-6. |
Procedure to work with ROI sequences:
Prerequisite: the ROI’s, which shall be used for the ROI sequence must have been added to the navigation database as navigation aids.
As the procedures differ quite a bit, the steps for waypoint-synchronized and time-based ROI sequences are separately described.
Steps for waypoint-synchronized ROI sequences
|
Step |
Action |
Flight preparation |
Optional |
|
1 |
On the RTE page of the FMS: define the flightplan (route) to be flown. Define as many waypoints as you like. The number of waypoints does not need to match the number of ROI’s of the ROI sequence, which is going to be defined later. |
X |
|
|
2 |
Change to the ROI pages of the FMS. |
X |
|
|
3 |
Define the ROI sequence. This can be accomplished in two ways: |
X |
|
|
3.a. |
Option 1: Load a ROI sequence · If the ROI sequence has been stored earlier, simply provide the name in the scratchpad and press LSK L5 (LOAD) |
X |
|
|
3.b |
Option 2: Create a ROI Sequence · On the second subpage of the ROI FMS page, select the trigger type for waypoint-synchronization by pressing LSK L3 (RTE WAYPOINT REACHED). · Start entering the ROI’s of the ROI sequence on page 3 of the ROI FMS page. Do this by
pressing the respective LSK L1-6, which either directly loads the ID of a
navigation aid from the scratchpad or, if the scratchpad is empty, shows the
list of all available navigation aids, which allows you to pick the right
one. |
X |
|
|
4 |
If you wish, you can return to page 2 of the ROI FMS page, provide a name in the scratchpad and press LSK R5 to store the ROI sequence for future usage. |
X |
X |
|
5 |
Take off, activate the autopilot and as suitable the LNAV mode (VNAV is optional for ROI sequences) |
|
|
|
6 |
If wished, lock the synthetic FPV view on the currently active ROI using the ROI button at the upper window boundary. |
|
X |
|
7 |
On the second ROI FMS page activate ROI sequences by pressing LSK 1R (the ROI sequence master On/Off switch). Note: the actual relations between ROI’s and waypoints are dynamic and depend on the moment, when the ROI sequence is activated. The number of already passed waypoints does not matter. At the time of activation, the first ROI will simply fall together with the next waypoint, which is going to be reached. Only if the ROI sequence is activated before the first waypoint is reached (- or – before the LNAV mode has been activated), the indexes of waypoints and ROI’s will match. |
|
|
|
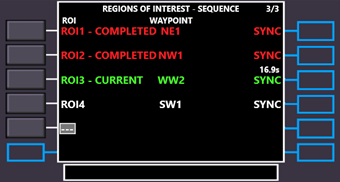
8 |
While the ROI sequence is executed, the progress is displayed on the FMS as follows:
Already passed ROI’s are shown in red, the one which is targeted by the current sweep in green and the remaining duration of the sweep in seconds above the green SYNC. |
|
|
|
9 |
The ROI sequence ends in one of three ways: a. Either the last ROI of the defined sequence has been reached. b. Or the pilot deactivates the ROI sequence with LSK R1 on the second ROI FMS subpage. c. Or the pilot deactivates the LNAV mode of the autopilot. |
|
|
Steps for time-based ROI sequences
|
Step |
Action |
Flight preparation |
Optional |
|
1 |
Change to the ROI pages of the FMS. |
X |
|
|
2 |
Define the time-based ROI sequence. This can be accomplished in two ways: |
X |
|
|
3.a. |
Option 1: Load a ROI sequence · If the ROI sequence has been stored earlier, simply provide the name in the scratchpad and press LSK L5 (LOAD) |
X |
|
|
3.b |
Option 2: Create a ROI Sequence · On the second subpage of the ROI FMS page, select the trigger type for waypoint-synchronization by pressing LSK R3 (ELAPSED TIME). ·
Start entering the ROI’s of the
ROI sequence on page 3 of the ROI FMS page. · For each time-based ROI, define the sweep time by putting the value in seconds into the scratchpad and pressing LSK R1-6. |
X |
|
|
4 |
If you wish, you can return to page 2 of the ROI FMS page, provide a name in the scratchpad and press LSK 5R to store the ROI sequence for future usage. |
X |
X |
|
5 |
Take off, activate the autopilot and fly a suitable flightpath. All autopilot modes can be used. |
|
|
|
6 |
If wished, lock the synthetic FPV view on the currently active ROI using the ROI button at the upper window boundary. |
|
X |
|
7 |
On the second ROI FMS page activate ROI sequences by pressing LSK 1R (the ROI sequence master On/Off switch). |
|
|
|
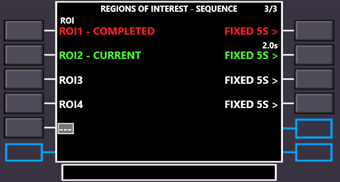
8 |
While the ROI sequence is executed, the progress is displayed on the FMS as follows:
Already passed ROI’s are shown in red, the one which is targeted by the current sweep in green and the remaining duration of the sweep in seconds above the green FIXED nS. |
|
|
|
9 |
The ROI sequence ends in one of two ways: d. Either the last ROI of the defined sequence has been reached. e. Or the pilot deactivates the ROI sequence with LSK 1R on the second ROI FMS subpage. |
|
|