7.3.7.3 Single and staged ROI’s
The elements to handle a single ROI are presented on the first page of the ROI
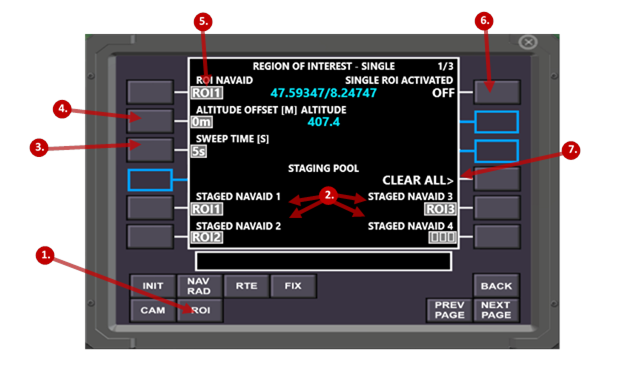
FMS page:
|
|
Element |
Remarks |
|
1 |
ROI Page Selection key |
Used to open the ROI FMS page |
|
2 |
Staging pool, staged ROI position 1 - 4 |
On these four positions, ROI’s (=
Navaids) can be loaded. A staged ROI can quickly be activated during the
flight by pressing the respective LSK. |
|
3 |
Sweep time [s] |
Whenever a new ROI is activated, the transition from the current camera direction to the new ROI takes as long, as the sweep time is configured. Default is 5s. |
|
4 |
Altitude offset [Meter] |
The altitude offset is added to the elevation of the next activated ROI. This allows to bring variation in the vertical movement of the camera. |
|
5 |
Currently active ROI |
On the top left line, the currently active ROI is displayed. It is loaded by either pressing LSK L1 and directly load the ID of a navigation aid from the scratchpad or, if the scratchpad is empty, get the list of all available Navaids, to pick the right one. Alternatively (and preferably), one of the four LSKs of the staging pool can be used, to directly load one of the staged ROI’s as the currently active ROI. |
|
6 |
Master single ROI On/Off switch |
Use LSK 1R to activate or deactivate ROI’s. Once single ROI’s are activated, the transition to the currently active ROI begins. |
|
7 |
Clear all staged ROI’s |
Allows to easily clear all staged ROI’s. |
Procedure to work with single ROI’s:
Prerequisite: the ROI’s, which shall be used have been added to the navigation database as navigation aids.
|
Step |
Action |
|
1 |
Enter up to four staged ROI’s. There are two possibilities, how you can do this: 1. Either enter the ID of the navigation aid in the scratchpad and press the respective LSK 2. Or press the LSK beside an empty staging position, as a result you get a list of all available navigation aids, so you can pick the right one. |
|
2 |
Define the sweep time in seconds or leave it at 5 seconds. The sweep time can be changed at any time, even during the flight. |
|
3 |
Load the currently active ROI either by selecting a navigation aid the usual way, or by pressing the LSK beside a staged ROI. |
|
4 |
Optionally define the offset altitude in Meter, which shall be added to the ROI’s elevation. |
|
5 |
Press ROI at the top of the synthetic FPV view if you prefer see, how the camera is pointing to the ROI. |
|
6 |
Activate single ROI’s using the on/off master switch |
|
7 |
While single ROI’s are activated, several actions are possible: a. Change the currently active ROI by pressing the LSK beside one of the staged ROI’s. b. This is even possible, while the last transition is still ongoing. c. The two parameters sweep time and altitude offset can be adjusted at any time. They become effective with the next ROI change. d. If only the altitude offset has been changed, LSK 2R becomes enabled (called SEND> update), which allows to start a transition to the new target altitude even without changing the current ROI. |