7.3.5.5 Using the BASIC autopilot modes (SPD, TRK, HDG, ALT, VS, FPA and FLCH)
Initiate a turn to a new target direction using the TRK or HDG mode:
|
Step |
Action |
|
|
1 |
Press and keep pressed the direction target value selector as marked on the screenshot. You need to continuously keep the finger on the touchscreen or the mouse button pressed for step 1, 2 and 3. |
|
|
2 |
The target directions open as a circle on the right side. Slide your finger over the touchscreen or move the mouse pointer (while keeping pressed the left mouse button) to the circle and either directly select one of the magenta quick target directions or start circling around the center to dial in any direction in between. The chevron pointer indicates the currently flown direction. The value in the display indicates the selected target direction. |
|
|
3 |
Lift your finger from the touchscreen or release the mouse button to lock in the new target direction. The aircraft will immediately start turning to the new target direction. |
|

Alternative input methods:
- Use the Surface Dial.
- Hold the mouse pointer over the target value selector and use the mouse wheel to select a new target direction.
- Use voice recognition to command a new target direction.
Toggle between HDG or TRK as directional mode:
|
Step |
Action |
|
1 |
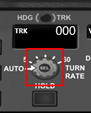
Press the HDG / TRK selector:
|
|
2 |
Each time the HDG / TRK selector is pressed, the directional mode toggles between HDG and TRK (as indicated on the Direction display beneath).
|

Note: for small and slow aircraft like UAS, drones or RC aircraft, it is recommended to use the TRK mode. As the speed of the aircraft often is not much higher than the speed of the wind, the flown course will deviate strongly from the direction into which the nose is pointing. Using the TRK mode you will get the course over ground, that matches the target value.
Climb or descend to a new target altitude:
|
Step |
Action |
|
|
1 |
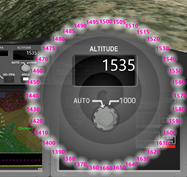
Press and keep pressed the altitude target value selector as marked on the screenshot. You need to continuously keep the finger on the touchscreen or the mouse button pressed for step 1, 2 and 3. |
|
|
2 |
The target altitudes open as a circle on the right side. Slide your finger over the touchscreen or move the mouse pointer (while keeping pressed the left mouse button) to the circle and either directly select one of the magenta quick target altitudes or start circling around the center to dial in any altitude in between. The value in the display indicates the target altitude, which would be selected if the finger would be taken from the touchscreen or the mouse button would be released. |
|
|
3 |
Lift your finger from the touchscreen or release the mouse button to lock in the new target altitude. The new altitude is only armed now, so the vertical mode, which was active before starting the user interaction, will remain effective (until the target altitude is crossed). |
|
|
4 |
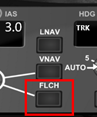
Initiate the climb or descend using either the VS, FPA or FLCH mode. Use one of the following procedures: a. Press the FLCH button to activate the FLCH mode. The aircraft will immediately initiate a climb or descend to reach and capture the new target altitude. b. To initiate climbs or descends using the VS or the FPA mode, see next paragraph |
|

Alternative input methods:
- Use the Surface Dial.
- Hold the mouse pointer over the target value selector and use the mouse wheel to select a new target altitude.
- Use voice recognition to command a new target altitude.
Note: the target altitudes are entered in the display unit for altitudes and distances, which can be Meter or feet (see section 7.3.1 how to change display units)
To initiate the actual climb or descend to the armed altitude requires using one of the following two possibilities:
1. Use the FLCH mode
– or –
2.
Use the VS or FPA mode
Initiate a climb or descend using the FLCH mode:
The easiest method, to initiate a climb or descend to a new target altitude (which has been armed as described just above) is using the FLCH (flight level change) mode.
As prerequisite to activate the FLCH mode, a new target altitude must have been armed before.
|
Step |
Action |
|
1 |
Press the FLCH button: |
|
2 |
The aircraft will start climbing or descending towards the armed target altitude. |
Initiate a climb or descend using the VS or FPA mode:
Typical cases, when the VS or FPA mode would be used:
1. In order to start climbing/descending to a new target altitude, which has been armed before.
– or –
2. The VS or FPA can also be used to climb or descend if no target altitude has been set. Be aware, that in this case the climb or descend would not be guarded and never stop (until the vehicle bumps into something hard!). It is required to press the ALT HOLD button to end unguarded climbs or descends (setting the target VS to 0 is not recommended but would have the same effect).
|
Step |
Action |
|
|
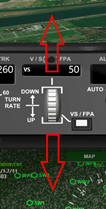
1 |
Press and keep pressed the VS / FPA thumbwheel. You need to continuously keep the finger on the touchscreen or the mouse button pressed for step 1, 2 and 3. Note: the default unit is Meter/minute. Specifying the climb rate per minute is common in manned aviation. |
|
|
2 |
Slide your finger or move the mouse pointer (while keeping pressed the left mouse button) either upwards to set a negative climb rate or downwards to establish a positive climb rate. This emulates the turn direction of thumbwheel. The value in the display indicates the target value for vertical speed or flight path angle. |
|
|
3 |
Lift your finger from the touchscreen or release the mouse button to lock in the new target value. |
|

Alternative input methods:
- Use the Surface Dial.
- Hold the mouse pointer over the target value selector and use the mouse wheel to select a new target altitude.
Toggle between VS or FPA mode:
|
Step |
Action |
|
1 |
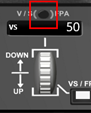
Press the V/S / FPA selector:
|
|
2 |
Each time the V/S / FPA selector is pressed, the climb/descend mode toggles between VS and FPA (as indicated on the display beneath).
|